


Hi everyone,
I’ve been working on a tool that may be useful in certain scenarios. Sometimes, shots are retimed after the match move is completed, and we need to ensure that Maya’s entire movement matches the retimed ones. We usually do this at the end of the comp. Although it’s not common to do it this way, here is the solution when you need to. Some match move artists and 3D generalists at MoonShine Studio provide an example of a data file exported from Nuke. It looks like this :

If you can’t export the time data as shown above, it’s likely because some setups were missed. I’ll show you how to do it. Let’s go through all the steps for exporting it from Nuke.
Step 1 :
The very first step is to create a「TimeWarp」node.

Step 2 :
Adjust the speed and change the filter option to「None」.

Step 3 :
Goto TimeWarp node and add a user knob by clicking the right mouse button. Select「Manage User Knobs」.

Step 4 :
Add an「Integer Knob」and remember to name it. Then hit ok.


Step 5 :
Now you'll see a time attribute appear in the User tab. Like below :

Then right-click at the time attribute and select「Add expression」 on the custom integer knob.

On the expression tab, add "t" and hit OK.

Step 6 :
1. Switch to「Dope Sheet」
2. Select「lookup」&「original」.
3. Right-click > File
4. Export Ascii...

If you cannot select the original attribute, you can go back to the previous step and right-click the「Set key」in the time field.

Step 7 :
1. Make sure your file name and path is correct
2. 「lookup」 : Retimed data.
3. 「original」: Time before changed.
It's better for Maya with the lookup data in the second column, but it's okay if you forget to set it. The tool I wrote still can reverse the data, so you can do it later in Maya.

So after exporting, you will get a time data file like this :

「 floor(curve+0.5) 」. ( Special thx to Wei Hong )
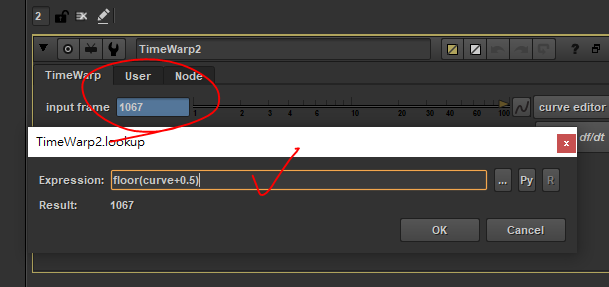
And the result will be like :

--------------- Here is the end of the Nuke's exporting process. ---------------
Now, We're going to take all these data to match the retimed state inside Maya.
Here's how it works :
Before Starting :
1. Make sure your Maya's time range is correct. (Original Time)
2. The Start Frame value is matched from the first time value of the data file.

Step 1 :
Click the「Add Time Warp」button to create a Scene Time Warp node. You can check the status by turning it ON or OFF with the buttons up there.
Step 2 :
Load the data file (timecurve), it will automatically show the time data in the list. If you set the column to the opposite way, remember to check the「Reverse Data Info」option before Applying.
Step 3 :
Simply press Apply ! and BOOM!! It's done.
Remind :
The Time Range option will set the outer range to ur original time length in the scene and the inner range to the retimed value, so if u don't want it to be changed, just uncheck before applying it to the scene. But it is clear to me and is a good option for seeing the result of before and after.
- Demonstration Video -


0 留言